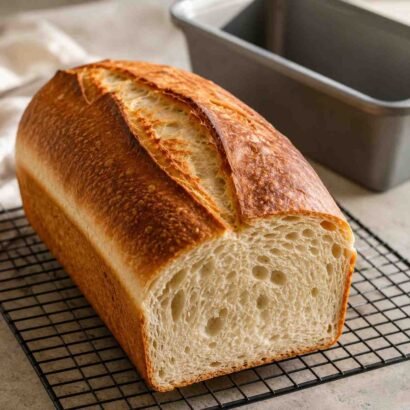
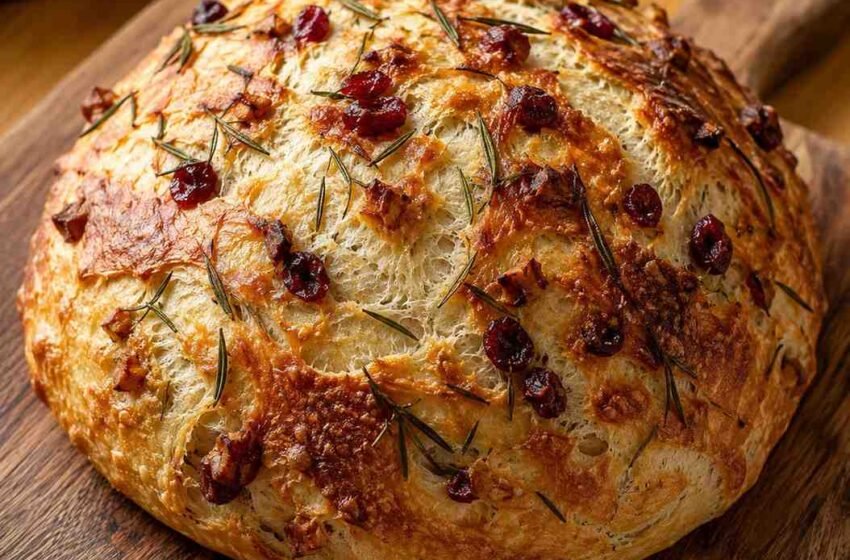
There’s something truly special about homemade artisan bread fresh from the oven. The crackling golden crust, soft airy interior, and irresistible aroma of roasted garlic and fresh rosemary create an experience that’s difficult to match with store-bought bread. This High-Protein Diabetic-Friendly Rustic No-Knead Rosemary Garlic Bread takes everything people love about traditional artisan bread and gives it a wholesome nutritional upgrade. By incorporating higher-protein ingredients and increasing the fiber content, this loaf delivers the rustic texture and bakery-quality appearance you expect while offering a more balanced nutritional profile.
Traditional artisan bread is often made entirely with refined white flour, which can digest quickly and provide little protein. This healthier version blends white whole wheat flour with bread flour, incorporates vital wheat gluten for improved protein and structure, and includes a small amount of whey protein isolate without compromising the bread’s classic texture. Ground flaxseed contributes fiber and healthy fats, while Greek yogurt helps create a moist, tender crumb that stays fresh longer. Fresh rosemary and roasted garlic infuse every bite with incredible flavor, making this bread delicious enough to enjoy on its own.
One of the best things about this recipe is its simplicity. There’s no kneading required, making it ideal for both beginner and experienced bakers. The long fermentation develops exceptional flavor while the Dutch oven creates a beautifully crisp crust that rivals artisan bakery loaves. Whether you’re serving it alongside soup, slicing it for sandwiches, or simply enjoying a warm piece with a drizzle of olive oil, this homemade bread is sure to become a favorite in your kitchen.
Why You’ll Love This Recipe
- High in protein compared to traditional artisan bread.
- Diabetic-friendly with added fiber.
- No kneading required.
- Crispy bakery-style crust.
- Soft and airy interior.
- Fresh rosemary and roasted garlic flavor.
- Easy overnight dough.
- Perfect for beginners.
- Excellent for meal prep.
- Freezes beautifully.
- Great for sandwiches and toast.
- Made with wholesome ingredients.
- Beautiful artisan appearance.
- Delicious fresh from the oven.
Also CheckOut: 30-Day High-Protein Meal Plan for Weight Loss: Easy Recipes, Meal Prep Tips & Complete Nutrition Guide
Equipments
- Large Mixing Bowl (5-quart) – Allows plenty of room for mixing and rising the dough.
- Wooden Spoon or Danish Dough Whisk – Easily combines the sticky no-knead dough.
- Measuring Cups – Ensures accurate flour and liquid measurements.
- Measuring Spoons – Measures yeast, salt, herbs, and seasonings precisely.
- Kitchen Scale (Optional) – Provides the most accurate flour measurements for consistent results.
- Plastic Wrap or Reusable Bowl Cover – Covers the dough during the long fermentation.
- Bench Scraper – Helps shape the sticky dough without deflating it.
- Parchment Paper – Makes transferring the loaf into the Dutch oven safe and easy.
- Dutch Oven (5 to 6-quart with lid) – Creates steam for an artisan-quality crust.
- Cooling Rack – Allows the bread to cool properly while maintaining its crisp crust.
- Sharp Bread Lame or Serrated Knife – Scores the dough before baking for beautiful expansion.
Ingredients
Dry Ingredients
- 2 cups bread flour
- 2 cups white whole wheat flour
- ¼ cup unflavored whey protein isolate
- 2 tablespoons vital wheat gluten
- 2 tablespoons ground flaxseed
- 2 teaspoons fine sea salt
- 2 teaspoons chopped fresh rosemary
- 1 teaspoon garlic powder
- 1 teaspoon instant yeast
- ¼ teaspoon freshly ground black pepper
Wet Ingredients
- 1½ cups warm water (about 105°F to 110°F)
- ¼ cup plain nonfat Greek yogurt
- 2 tablespoons extra-virgin olive oil
Roasted Garlic
- 1 whole garlic bulb
- 1 teaspoon olive oil
Optional Toppings
- Fresh rosemary sprigs
- 2 tablespoons chopped walnuts
- 2 tablespoons dried cranberries (optional)
- Flaky sea salt
- Fresh cracked black pepper
Ingredient Notes
Bread Flour
- Bread flour provides the high gluten content needed to create a chewy artisan crumb with excellent structure. It produces the classic airy texture associated with rustic bakery loaves while supporting the added protein ingredients.
White Whole Wheat Flour
- White whole wheat flour contributes additional fiber and nutrients while maintaining a lighter texture than traditional whole wheat flour. It blends beautifully with bread flour to create a loaf that’s hearty without becoming dense.
Whey Protein Isolate
- A small amount of unflavored whey protein isolate increases the overall protein content without dramatically changing the dough. Using too much protein powder can make bread dry, so this carefully balanced quantity preserves the soft interior.
Vital Wheat Gluten
- Vital wheat gluten strengthens the dough while improving elasticity and rise. It helps offset the additional protein and whole-grain flour, resulting in a beautifully airy loaf with excellent oven spring.
Ground Flaxseed
- Ground flaxseed adds fiber, omega-3 fatty acids, and subtle nutty flavor. It also helps the bread retain moisture, allowing it to stay fresh longer after baking.
Instant Yeast
- Instant yeast simplifies the recipe because it can be mixed directly with the flour. During the long fermentation, it slowly develops flavor while creating the open crumb typical of artisan bread.
Fresh Rosemary
- Fresh rosemary provides bold herbal flavor and incredible aroma throughout the loaf. Finely chopping the rosemary distributes its oils evenly while preventing large woody pieces from disrupting the texture.
Garlic Powder
- Garlic powder seasons the dough evenly while complementing the roasted garlic cloves added later. It enhances the savory flavor without introducing excess moisture.
Greek Yogurt
- Plain nonfat Greek yogurt contributes additional protein while helping create a moist, tender crumb. It also provides slight acidity that supports gluten development and enhances the overall flavor.
Extra-Virgin Olive Oil
- Olive oil adds richness while improving the bread’s texture and helping the crust achieve a beautiful golden color during baking.
Roasted Garlic
- Roasting transforms garlic into soft, sweet cloves with a mellow flavor that blends beautifully into the dough. It adds incredible depth without the sharpness of raw garlic.
Warm Water
- Warm water activates the yeast and hydrates the flour. Water that’s too hot can damage the yeast, while water that’s too cool may slow fermentation significantly.
Optional Walnuts
- Chopped walnuts provide additional texture, healthy fats, and a subtle nutty flavor that pairs wonderfully with rosemary and garlic.
Optional Dried Cranberries
- A small amount of dried cranberries adds pops of sweetness and beautiful color to the crust. They are optional and can be omitted for a lower-carbohydrate loaf.
How to Make High-Protein Diabetic-Friendly Rustic No-Knead Rosemary Garlic Bread
- Preheat your oven to 400°F (200°C). Slice the top off the garlic bulb, drizzle it with one teaspoon of olive oil, wrap it loosely in aluminum foil, and roast for approximately 35 to 40 minutes until the cloves become soft, fragrant, and lightly caramelized. Allow the garlic to cool before squeezing the roasted cloves from their skins.
- In a large mixing bowl, combine the bread flour, white whole wheat flour, whey protein isolate, vital wheat gluten, ground flaxseed, sea salt, chopped rosemary, garlic powder, instant yeast, and black pepper. Whisk thoroughly so all dry ingredients are evenly distributed.
- In a separate bowl, whisk together the warm water, Greek yogurt, and olive oil until smooth. The yogurt should dissolve into the liquid without visible lumps.
- Pour the wet ingredients into the bowl of dry ingredients. Using a wooden spoon or Danish dough whisk, stir until no dry flour remains. The dough will appear shaggy, sticky, and much wetter than traditional bread dough.
- Add the roasted garlic cloves and gently fold them into the dough. Some cloves may break apart naturally, distributing their sweet garlic flavor throughout the mixture.
- If using chopped walnuts or dried cranberries, gently fold them into the dough now. Avoid excessive stirring to preserve the dough’s developing gluten structure.
- Cover the bowl tightly with plastic wrap or a reusable bowl cover. Leave the dough at room temperature for 12 to 18 hours, allowing the yeast to slowly ferment the dough. During this time, it will roughly double in size and develop numerous air bubbles.
- After the long fermentation, lightly flour your work surface. Carefully turn the sticky dough out of the bowl using a bench scraper, trying not to deflate the trapped air bubbles.
- Fold the edges of the dough gently toward the center several times to create surface tension. Rotate the dough as you fold until a rough round boule begins to form without aggressive kneading.
- Place the shaped dough seam-side down on a sheet of parchment paper. Cover loosely with a clean kitchen towel and allow it to rest for 45 to 60 minutes while the oven and Dutch oven preheat.
- About 30 minutes before baking, place the empty Dutch oven with its lid into the oven and preheat to 450°F (232°C). Heating the Dutch oven thoroughly is essential for creating the steam that produces the signature crackling artisan crust.
- Just before baking, lightly dust the surface of the dough with flour if desired. Using a bread lame or very sharp knife, score the top of the loaf with one or two deep slashes to control expansion during baking.
- Carefully remove the fully preheated Dutch oven from the oven using oven mitts. Lift the dough by the parchment paper and gently lower it into the hot Dutch oven without disturbing its shape. Cover immediately with the lid to trap steam, which helps develop a beautifully crisp artisan crust.
- Bake the covered loaf for 30 minutes. During this time, the trapped steam allows the bread to expand fully while creating a thin, crackly crust and a light, airy interior.
- Remove the Dutch oven lid carefully to avoid the escaping steam. Continue baking for an additional 12 to 18 minutes, or until the crust becomes a deep golden brown with beautifully blistered, crispy edges.
- If using fresh rosemary sprigs, gently press a few onto the top of the loaf during the final 8 minutes of baking so they become lightly toasted without burning.
- For an attractive rustic finish, sprinkle a few chopped walnuts or dried cranberries over the loaf during the last few minutes of baking if desired. They lightly toast while adding beautiful color and texture.
- Check the bread for doneness by tapping the bottom of the loaf. It should sound hollow. For the most accurate result, insert an instant-read thermometer into the center of the loaf. The internal temperature should read approximately 205°F to 210°F (96°C to 99°C).
- Carefully transfer the bread to a wire cooling rack. Resist slicing immediately, as the crumb continues setting while it cools.
- Allow the bread to cool for at least one hour before cutting. This helps preserve the airy texture and prevents the loaf from becoming gummy.
- Slice using a sharp serrated bread knife. Serve warm or at room temperature with olive oil, whipped butter, herbed cream cheese, or alongside soups, salads, and grilled proteins.
Recipe Information
- Prep Time: 20 minutes
- Rise Time: 12–18 hours
- Cook Time: 48 minutes
- Cooling Time: 1 hour
- Total Time: Approximately 15 to 20 hours
- Servings: 12 slices
- Cuisine: American, Artisan Bread
- Course: Bread, Side Dish
Flavor Profile Breakdown
- Crispy artisan-style crust.
- Soft and airy interior.
- Sweet roasted garlic throughout.
- Fresh earthy rosemary.
- Mild olive oil richness.
- Slight nuttiness from flaxseed.
- Gentle whole wheat flavor.
- Bakery-quality aroma and texture.
Pro Tips for Best Results
- Weigh your flour using a kitchen scale for consistent results.
- Allow the full overnight fermentation for maximum flavor.
- Fully preheat the Dutch oven before baking.
- Avoid adding too much flour during shaping.
- Score the dough confidently with a sharp blade.
- Let the loaf cool completely before slicing.
- Use fresh rosemary whenever possible.
- Roast the garlic until soft and caramelized for the sweetest flavor.
Variations & Substitutions
- Replace rosemary with fresh thyme.
- Add chopped fresh sage.
- Mix in grated Parmesan cheese.
- Add chopped olives for Mediterranean flavor.
- Replace walnuts with chopped pecans.
- Sprinkle sesame or sunflower seeds over the crust.
- Add cracked black pepper for extra spice.
- Include shredded sharp cheddar for a cheesy loaf.
Common Mistakes to Avoid
- Using water that’s too hot for the yeast.
- Skipping the overnight rise.
- Overhandling the dough after fermentation.
- Forgetting to preheat the Dutch oven.
- Slicing while the bread is still hot.
- Adding excessive flour during shaping.
- Underbaking the loaf.
- Skipping the scoring step.
Serving Suggestions
- Serve with homemade vegetable soup.
- Pair with grilled chicken breast.
- Enjoy with olive oil and balsamic vinegar.
- Toast for breakfast with natural peanut butter.
- Serve alongside roasted turkey.
- Make healthy gourmet sandwiches.
- Pair with diabetic-friendly chili.
- Enjoy with scrambled eggs.
- Serve with cottage cheese and tomatoes.
- Add to holiday dinner baskets.
Storage & Reheating Tips
- Store completely cooled bread in a paper bag or bread box for up to 2 days.
- Transfer to an airtight container after the second day.
- Refrigerate for up to 5 days.
- Freeze sliced bread for up to 3 months.
- Toast directly from frozen when needed.
- Refresh the crust by warming in a 350°F (175°C) oven for 8 to 10 minutes.
- Avoid storing in plastic while still warm.
- Slice only as needed to help maintain freshness.
Nutrition Information (Approximate)
- Calories: 180 kcal
- Protein: 10 g
- Carbohydrates: 19 g
- Fat: 5 g
- Fiber: 4 g
- Sugar: 1 g
- Sodium: 290 mg
Final Thoughts
This High-Protein Diabetic-Friendly Rustic No-Knead Rosemary Garlic Bread proves that homemade artisan bread can be both nourishing and incredibly satisfying. By combining bread flour with white whole wheat flour, adding protein-rich ingredients, and incorporating aromatic rosemary and roasted garlic, this loaf delivers bakery-quality flavor with improved nutrition. Its crisp golden crust, tender open crumb, and rich savory aroma make it perfect for everything from hearty sandwiches to elegant dinner tables. Once you experience how simple this no-knead method is, you’ll find yourself baking this rustic loaf again and again.
FAQs
Can I make the dough ahead of time?
Yes. The dough can ferment in the refrigerator for up to 48 hours after the initial rise, developing even deeper flavor before baking.
Is this bread really no-knead?
Yes. The long fermentation naturally develops gluten, eliminating the need for traditional kneading.
Why use a Dutch oven?
A Dutch oven traps steam released by the dough, creating the crisp, blistered crust that artisan breads are known for.
Can I freeze this bread?
Absolutely. Slice the loaf first, wrap it tightly, and freeze for up to 3 months for easy individual servings.
Can I substitute active dry yeast?
Yes. Dissolve the active dry yeast in the warm water for about 5 to 10 minutes before mixing with the remaining ingredients.
Why should I wait before slicing?
Cooling allows the crumb structure to finish setting. Cutting too early may result in a gummy interior.
Can I omit the whey protein isolate?
Yes. The bread will still bake successfully, although the overall protein content will be lower.
Can I add cheese to this recipe?
Yes. Freshly grated Parmesan, Asiago, or sharp cheddar can be folded into the dough for additional savory flavor.