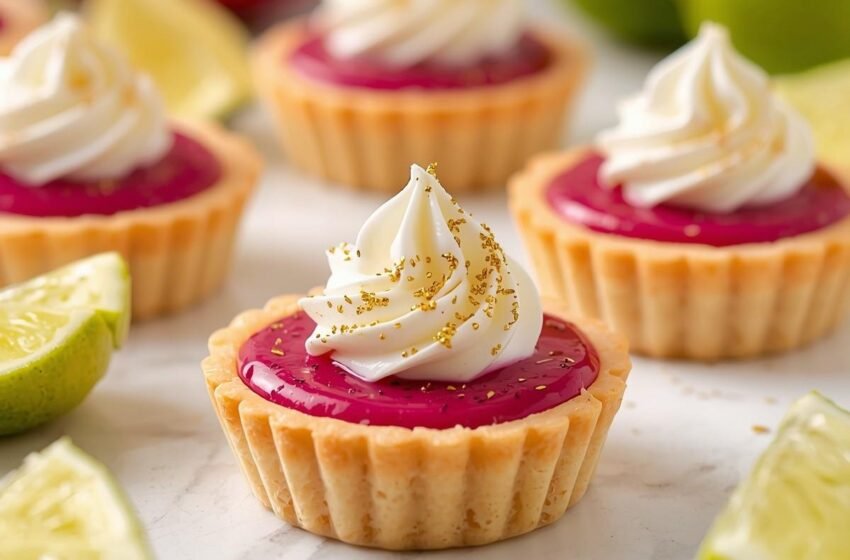
These Dragon Fruit and Lime Tarts are vibrant, refreshing, and incredibly eye-catching desserts that instantly brighten any dessert table. The vivid pink dragon fruit filling paired with zesty lime creates a tropical flavor combination that feels light, creamy, and perfectly balanced. Nestled inside crisp tart shells and topped with fluffy whipped cream, these mini tarts are as beautiful as they are delicious.
Perfect for summer gatherings, brunches, birthdays, or elegant dinner parties, these tarts deliver a smooth citrusy filling with a naturally stunning color. Dragon fruit adds a subtle sweetness and gorgeous appearance, while fresh lime juice brings brightness and tang that elevate every bite. Whether you are making them for a special event or simply want a unique homemade dessert, these tropical tartlets are guaranteed to impress both visually and flavor-wise.
Why You’ll Love This Recipe
- Stunning naturally vibrant pink filling
- Refreshing tropical flavor combination
- Crisp buttery tart shell with creamy filling
- Perfect balance of sweet and tangy
- Great for parties and entertaining
- Elegant bakery-style presentation
- Easy to customize with toppings
- Refreshing chilled dessert for warm weather
- Smooth and silky texture
- Beautiful individual serving portions
Ingredients
- 1 1/4 cups all-purpose flour
- 1/4 cup powdered sugar
- 1/2 cup cold unsalted butter, cubed
- 1 egg yolk
- 2 tablespoons cold water
- 1 1/2 cups fresh dragon fruit flesh
- 1/2 cup fresh lime juice
- Zest of 2 limes
- 1/2 cup granulated sugar
- 3 large egg yolks
- 3 tablespoons cornstarch
- 1/2 cup coconut milk
- 2 tablespoons unsalted butter
- 1 teaspoon vanilla extract
- 1 cup whipped cream or coconut whipped cream
- Lime slices and dragon fruit cubes for garnish
Equipments
- 4-inch tart pans or mini tart molds for individual tarts
- Food processor for preparing tart dough quickly
- Medium saucepan for cooking the filling
- Fine mesh strainer for silky smooth texture
- Rolling pin for tart dough
- Mixing bowls for ingredient preparation
- Whisk for blending curd mixture smoothly
- Silicone spatula for scraping mixtures evenly
- Citrus zester for fresh lime zest
- Refrigerator space for chilling and setting the tarts
How to Make Dragon Fruit and Lime Tarts
- Add the flour and powdered sugar to a food processor and pulse briefly to combine evenly.
- Add the cold cubed butter and pulse until the mixture resembles coarse crumbs.
- Add the egg yolk and cold water gradually while pulsing until the dough begins to come together.
- Transfer the dough onto a lightly floured surface and gently shape it into a disk.
- Wrap the dough in plastic wrap and refrigerate for at least 30 minutes to firm up.
- Preheat the oven to 350°F while the dough chills.
- Roll out the dough evenly and press it carefully into mini tart pans.
- Trim any excess dough from the edges and prick the bottoms lightly with a fork.
- Chill the tart shells for another 10 minutes before baking to help maintain their shape.
- Bake the tart shells for about 15 minutes until lightly golden around the edges.
- Allow the tart shells to cool completely before filling.
- Scoop the dragon fruit flesh into a blender and blend until smooth.
- Pour the puree through a fine mesh strainer to remove excess seeds if desired.
- In a saucepan, whisk together the dragon fruit puree, lime juice, lime zest, sugar, egg yolks, and cornstarch.
- Cook the mixture over medium heat while whisking constantly to prevent lumps from forming.
- Continue stirring until the filling thickens into a smooth custard-like consistency.
- Remove the saucepan from the heat and stir in the coconut milk, butter, and vanilla extract.
- Mix thoroughly until the butter melts completely and the filling becomes glossy.
- Allow the filling to cool slightly before spooning it into the baked tart shells.
- Smooth the tops evenly with the back of a spoon or spatula.
- Refrigerate the filled tarts for at least 2 hours until fully chilled and set.
- Pipe whipped cream or coconut whipped cream onto the top of each tart before serving.
- Garnish with lime slices, dragon fruit cubes, or extra lime zest for a vibrant finish.
Recipe Information
- Prep Time: 35 minutes
- Cook Time: 20 minutes
- Chill Time: 2 hours
- Total Time: 2 hours 55 minutes
- Servings: 6 mini tarts
- Cuisine: Tropical Fusion
- Course: Dessert
Flavor Profile Breakdown
- Bright citrusy lime flavor
- Mild tropical sweetness from dragon fruit
- Creamy silky tart filling
- Crisp buttery tart shell
- Light coconut undertones
- Refreshing and fruity finish
Pro Tips for Best Results
- Use ripe pink dragon fruit for the most vibrant color
- Chill the tart dough before baking for crisp shells
- Strain the filling for extra smooth texture
- Use fresh lime juice instead of bottled juice
- Whisk continuously while cooking the filling
- Allow tart shells to cool completely before filling
- Chill thoroughly before serving for cleaner slices
- Garnish just before serving for freshest presentation
Variations & Substitutions
- Replace dragon fruit with passion fruit or mango
- Use graham cracker crust instead of tart pastry
- Add coconut flakes to the tart shell
- Substitute lemon juice for lime juice
- Use dairy-free butter for a vegan option
- Add fresh berries for extra fruity flavor
- Make one large tart instead of mini tarts
- Top with toasted coconut for texture
Common Mistakes to Avoid
- Overworking the dough can make tart shells tough
- Filling hot tart shells may soften the crust
- Skipping the chilling step prevents proper setting
- Cooking the filling on high heat may scramble the eggs
- Using underripe dragon fruit reduces sweetness
- Overbaking the tart shells can make them dry
- Adding too much lime juice may overpower the fruit flavor
- Not straining the filling can create uneven texture
Serving Suggestions
- Serve chilled for the best texture
- Pair with iced tropical drinks
- Garnish with edible flowers for elegance
- Add fresh mint leaves for freshness
- Serve on dessert platters at parties
- Pair with coconut ice cream
- Enjoy alongside fresh tropical fruits
- Serve after spicy meals for a refreshing finish
Storage & Reheating Tips
- Store the tarts covered in the refrigerator for up to 4 days
- Keep whipped cream toppings separate until serving
- Do not freeze fully assembled tarts because texture may change
- Tart shells can be made ahead and frozen separately
- Store tart shells in airtight containers for crispness
- Avoid leaving the tarts at room temperature too long
- Refrigerate leftovers immediately after serving
Nutrition Information (Approximate)
- Calories: 290 kcal
- Protein: 4 g
- Carbohydrates: 34 g
- Fat: 15 g
- Fiber: 3 g
- Sugar: 18 g
- Sodium: 95 mg
Final Thoughts
These Dragon Fruit and Lime Tarts are the ultimate tropical dessert for anyone who loves vibrant colors and refreshing flavors. The creamy pink filling, crisp tart shell, and bright citrus notes come together beautifully in every bite. They look elegant enough for special occasions while still being approachable for home bakers. With their naturally striking appearance and refreshing taste, these tartlets are sure to become a memorable dessert favorite.
FAQs
What does dragon fruit taste like in these tarts?
Dragon fruit has a mild sweetness with subtle kiwi-like notes, while the lime adds most of the bright citrus flavor.
Can I make these tarts ahead of time?
Yes, they are perfect for making ahead because chilling improves both texture and flavor.
Can I use frozen dragon fruit?
Yes, frozen dragon fruit works very well once thawed and drained properly.
How do I get a bright pink filling?
Use red or magenta-fleshed dragon fruit for the most vibrant natural color.
Can I make this recipe dairy-free?
Yes, substitute coconut cream and dairy-free butter for a fully dairy-free dessert.
Why did my filling turn lumpy?
The filling was likely cooked over heat that was too high. Constant whisking over medium heat prevents lumps.
Can I use store-bought tart shells?
Yes, premade tart shells can save time and work perfectly for this recipe.
How long should the tarts chill before serving?
They should chill for at least 2 hours so the filling fully sets and becomes smooth and creamy.